Tuesday, September 16, 2014

Homemade wool hackle


After a long hiatus, I'm back for another posting. This time I am making my own wool blending hackle and diz so I can blend my own fibers before spinning (and because it's a lot cheaper than buying.)

Without further ado...

Materials:


1) 1 2x4 long enough for your work station (I bought one the was 3' for $1.39 and cut it down to 23")


2) 2 C-clamps wide enough to fit around the board and your work station (mine cost $3.39 a piece and are 3")


3) Identical wide tooth combs with long teeth, preferably hair picks; you need enough to reach from end to end minus 2" on each side (I could not find any picks that were sturdy enough so I bought the long wide tooth variety. Actually, I bought 3 packs of 8 different combs from the Dollar Tree, 24 combs for $3! I only needed three of the long purple ones up front because they were 6" long)


4) Wood screws (no picture)

5) 3 fender washers in different sizes (mine are 5/16 x 1 1/2, 3/8 x 1 1/2, 3/16 x 1 1/2, you can use whatever size works for you, I chose the washers in 1 1/2" because they fit in my hand most comfortably. The inside diameter will determine the thickness of your finished roving thickness, I bought 3 so I can make different size roving)


Tools:

Screw driver
Drill and drill bits (optional but highly recommended)
Knife (like a Gerber or Leatherman, not a kitchen knife)
Tape measure
Pencil


Instructions:

Step 1) 

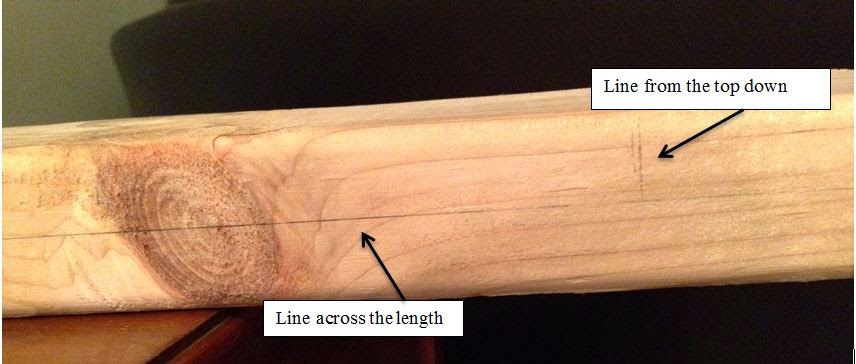
You will need to determine if your board fits your work station, if not you will need to cut it. Remember, if you need to cut your board, measure twice, cut once and be careful.

Disregard step 2 if the body of your combs are wider than the edge (the long 1 1/2" to 2" side) of you board.

Step 2: 

When the size of your board works for you, you will need to measure the body of the comb
(mine were 3/4".) When you know what the height of the body of your combs are you will need to take your pencil, measuring tape, and board and mark where the comb will sit on the edge of the board. For example, I laid my board on its widest side and measured 3/4 down from the top, where the teeth meet the body of the combs should be level with the top of the board. When you know where your combs should sit draw a level line using your measuring tape across the length of your board.


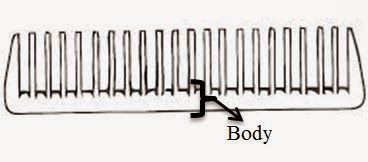
Disregard step 3 if your combs are shorter than the edge of your board.

Step 3:

For combs with a longer body like picks, when attaching your combs the point where the body meets the teeth should be level with the edge of the board when the board is lying on its widest point.

Step 4: 

Next you will need to determine where you will place you screws, I recommend at least 2 screws for combs that are 4" or less wide and 3 screws for combs with a wider body, I used 3 screws for my combs because they are roughly 6" each. Since I have 3 combs and need 3 screws for each I need 9 holes drilled, this may be different for you depending on your combs.Using your pencil, mark where you will make your holes, (for shorter body combs this should be in between the edge and the line you drew earlier) I recommend that you use your tape measure so your marks will be in a straight line. Drill your holes where you marked on the board, please see chart to determine which drill bit you should use based on your board and screws and be careful. You can do this without a drill but I do not recommend it. (At my local hardware store the boards are labeled as SPF, which stands for the type of wood they use; either spruce, pine, or fir, these are soft woods and I had size 6 screws so I used a 3/32 straight bit.)


As you can see, I did not follow my own advise and my holes are not straight, oh well. In the end it didn't make much difference.

Step 5:

You will now need to put holes in the bodies of your combs (you might be able to use the drill on your combs as well, it might be easier to line the holes up that way. I did not use the drill because I did this on my own and wanted to limit my drilling since I hadn't actually used the drill before.) To make the holes by hand you need to mark with your knife (or sharpie if you have one available) where the holes will line up on your combs; this was mostly done by guessing. I marked below my holes on the board so I had good idea where to make the holes on the comb. If you measured where is on your board you should probably have a better chance of where to make your holes than just guessing. When you know where you are going to put your hole, carve out a hole on the comb body with your knife. Try lining up the hole with the corresponding hole on your board, if you can see the hole in the board, continue with the others holes and screw the comb onto you board. Do this for all of your combs.


Step 6:

Congratulations! You have finished the board (and possibly have a lot of combs left over...), now all you need to do is place it on your work station and clamp it down using your c-clamps. Since fiber can be messy I put down a paper bag under my board before I clamped it down.

My cat, modeling the finished product.


Thursday, April 10, 2014

Spring Granny Square Blanket


Spring Granny Square Blanket
*Please read all instruction before you start as there are different color combinations

Material:
Caron Simple Soft or similar
Grape (color A)
Lime Light (color B)
Watermelon (color C)
Blue Mint (color D)
Pagoda (color E)
Crochet hook: I/9 – 5.50
Tapestry needle

Abbreviations:
Ch: chain
Sp: space
Sc: single crochet
Dc: double crochet
Tc: triple crochet


Notes:
This is a work in progress (as of 4/10/14) but a request has been made for me to write up a pattern. I will update this as I finish.
Square dimensions (not blocked) are 4x4
Each row has 12 squares, 3 of each color combination.
There are 15 rows.
There are 8 different color combination, they are:


1)    A, B, C, D
2)    D, A, B, C
3)    C, B, A, D
4)    B, A, D, C
5)    B, C, D, A
6)    C, D, A, B
7)    D, C, B, A
8)    A, D, C, B


Grape (color A)
Lime Light (color B)
Watermelon (color C)
Blue Mint (color D)


Pattern:
Magic circle
Sc 4 into circle
Ch 3, dc in same sp, 2 dc in each following sp (8 dc)
Ch 3, dc in same sp, 2 dc in each following sp (16 dc)
Ch 3, 2 dc in same sp, [(3 tc, ch 3, 3 tc in sp) 3 dc) repeat 3 times (12 dc, 24 tc, 4 3ch sp)
Ch 3, 2 dc in same sp, 3 dc in next sp, [(3 tc, ch 3, 3 tc in sp) 3 dc, 3 dc) repeat 3 times (24 dc, 24 dc, 4 ch3 sp)

Assembly:
Row one is made up of squares 1, 2, 3, and 4 (repeat 3 times)
Row two is made up of squares 5, 6, 7, and 8 (repeat 3 times)
Row three is made up of squares 4, 3, 2, and 1 (repeat 3 times)
Row four is made up of squares 8, 7, 6, and 5 (repeat 3 times)

Lay out all of row one and row two next to each other; join using a single crochet join with Pagoda joining both rows together, do not join vertically! Join all following rows as the first row.  After rows 1 – 15 are joined horizontally join using single crochet join vertically starting at the left side of row 1. Block if desired.

Tuesday, April 8, 2014

Blue Patterned Infinity Scarf


Materials
Hook size – 8mm/ numeric size 11/ L

Aran weight yarn – 109+ yards

Tapestry needle


Abbreviations
Ch/s – chain

HDC – half double crochet (yarn over, inset hook into your work, yarn over again and pull loop up, yarn over once more and pull through all three loops on hook. )


Pattern
Foundation: Ch 12

Row 1: HDC in third loop from hook and following 9 chs, ch 1 (10 HDC + ch 1)

Row 2: HDC through all 3 loops of previous HDC10 times, ch 1 (10 HDC + ch 1)

Repeat Row 2 until desired length is reached. On the last row, do not cut the yarn and pull through last loop. Block the scarf until the patter is set. When the scarf is ready fold it in half and slip stitch the ends together and weave in the ends.


Thursday, March 13, 2014

Book Making

This year I am making my husband's grandmother a handmade book. I will probably put pictures and crocheted motifs in it. This is a chronicled journey of the book making process. If you are trying this for yourself I would recommend reading though all of the direction before attempting this, it should take a few days to complete. Some instructions have notes after them, they're important!


Materials needed are; 1/2 yard of your choice of fabric, rubber cement or craft glue, scissors, white thread, a pencil, a needle, scrap yarn, a ruler, wax, bias type, cardboard, your choice of paper, printer paper, and a paper bag. Optional, two small piece of black fabric (not pictured.)


First we decide how many pages you would like. The equation for this is (n*8) - 2. n represents the number of paper clusters you have. The 8 represents 4 pages that have been folded in half to create an 8 page cluster. You subtract 2 because you will be gluing these page to the books covering later.

Example: I have 4 pages folded in half making 8 pages ( 1 cluster), I do this 8 times giving me 64 pages, minus 2 pages that will be glued to the covers.

Note: You should not go above an 8 page cluster because it will make the binding process harder later.


Next we need to place the pages under pressure. Preferably for 24 hours.


Next we will be marking our place for internal bindings. With your pencil mark 1 1/2 inches down from the top of the book (left). Your second mark should be 1 centimeter from your first mark. The third mark should be 1 cm from the second. Repeat the direction on the other end.


With your needle poke holes where you marked your papers.


This shows all of the page clusters with the holes poked in them.


Next we run our thread through the wax. This will prevent the yarn for damaging the paper.

Note: I got this wax at Wal-Mart, it was about $2 for for 6 blocks. It was in the candle section.

Thread the yarn through the first hole. You are going INTO the books pages.

Sorry for the bad lighting!


Come through the next hole with the yarn.

You go into the book on the third hole. This leave a yarn trial down the bend of the page. Come out through the forth hole, back in though the fifth hole and back out in the sixth hole. Leave some slack in the yarn.

This is what the inside of the page cluster should look like.


Take another page cluster and repeat the process from the bottom up. Start by going INTO the bottom of the page and working your way up.


It should look like this. On the last hole of the second page your yarn should be coming out.


Next we take our scrap yarn and place in between the loops your thread made. This provides sturdiness for the binding.


Tighten the yarn and tie a knot next to the paper.
Do not cut the yarn!
Continue this until all of your page clusters are tied together.

Note: tie a knot in the thread at each end of the page clusters except the very first (at the end).

This is what it should look like.
There should be knots on all holes 1 and 6 starting on the top of the second page cluster.


We now need to put the book under pressure again. My text book alone were not enough so I used aquarium salt. Find anything you have that will not get the pages dirty.

Now we cut the yarn down to about an half an inch and add glue. Be careful not to use too much glue or it will seep through the pages. Do the same for the other side.


We then add our printer paper to the glue and lightly press it on, more glue may be needed. When the glue dries you then need to glue the back of the pages, where the pages are sewn together, and press the paper to the page clusters. When that dries glue the printer paper to the other side.

Note: The printer paper should have been cut to be smaller than your pages, you don't want it to hang over the edges.


Now you need to cut your two pieces of cardboard. The back of the pages should be lined up with the cardboard and there should be margin around the pages less than 1 cm. The margin is so the edges of your pages don't get ruined.

At this point you should rub your wax along the edges of the cardboard. This keeps your fabric from sustaining too much wear and tear.


This part is a decorative option: Cut and glue black fabric pieces to each end of your book. Care should be used in not letting the fabric hang over the edges because it will bunch up when you attach the cover. The fabric should reach to where the edge of the cardboard would lay.

Note: Also, if you can see, I got glue under my nail. Try to avoid this, it can ruin your pages.


This is the other end. If you notice, the fabric is slightly too large for the binding. It needs to be trimmed.


Now we attach the bias tape. Cut your tape so that it fits around the book to about 1 inch from the edge of the page on each side. Glue the tape on and let it dry.

Now we're creating the binding. Cut a piece of your paper bag to the same height of your pages, my pages height are 8 1/2 inches so that's how long it should be. It should cover about a half of you page on each side, this part does not need to be exact.


With your printer paper cut a piece the same length of your paper bag (8 1/2 inches). Glue the paper strip onto the paper bag and wait for it to dry. After the glue dries bend the paper bag next to the printer parer. This is where you will be attach you book covers (cardboard).

Now you glue the cardboard onto the paper bag piece. After it dries the covers should work like flaps.
The cardboard is sightly longer that the paper bag, if you recall, this is to protect the page's edges.

After the glue is completely dry everywhere fold your fabric in half and wrap the cardboard around the edges gluing it down. It must be dry before attaching the pages or the fabric will slip.

Note: The fabric needs to be loose enough to fold the covers up but not so loose that it moves around.
Next we glue the first and last pages onto the front and back covers.

Ta-Da! The finished product. Ok, not really, it needs to dry again and then pressed for another 24 hours before anything else can be put in it but this is what it should look like.


Happy book making!